

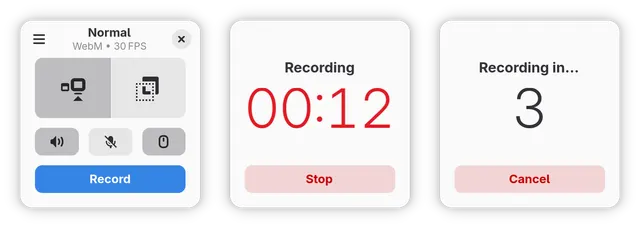
Kooha is a free Linux screen recorder for demonstrations, lessons and bug reports. Install its official Flatpak, choose what to capture and review a short saved recording before starting a longer session. It replaces the local recording part of a paid workflow when you do not need bundled cloud sharing or a video editor. The official README, interface definitions and license were reviewed on October 15, 2026. AltStack has not installed Kooha or performed this recording exercise; these steps follow primary sources, and desktop permission dialogs differ by distribution.
1. Check the price, platform and task
Kooha uses GPL-3.0-or-later and the project states that it is free to use. Donations are optional. This local workflow needs no paid Kooha account or cloud-minute allowance. Your computer, storage and any separate editing or sharing service still have their own costs. Kooha targets Linux desktops; do not assume a similarly named Windows installer or Android APK is this project.
Choose one small task for your first attempt: demonstrate an action using sample files for ten seconds. Recording a screen is different from publishing a team video library, measuring viewer engagement or editing a course. Kooha creates local files, and you arrange any later editing and publication. Prepare invented sample text rather than your only copy of private work. You should be able to judge picture, sound and file location independently when the trial ends.
2. Install the official Flatpak
Open the SeaDve/Kooha repository and follow its Flathub link. The application ID is io.github.seadve.Kooha. If Flatpak and Flathub are not configured, use the official Flatpak setup page for your Linux distribution first. Then review and run flatpak install flathub io.github.seadve.Kooha. Check the application and remote named in its confirmation. Launch from your application menu or with flatpak run io.github.seadve.Kooha. These are commands for you to inspect and run; AltStack has not executed them on your system.
The upstream README distinguishes its recommended Flatpak from independently maintained distribution packages. Packages with the same name may have different versions and support routes. Beginners do not need a source build or GNOME Builder for ordinary recording. If installation fails, resolve the package or remote error before changing microphone permissions. Keep updates on your chosen trusted channel instead of installing an unrelated download from an advertisement.
3. Prepare a private desktop and destination folder
Close private documents, hide notifications and review every connected display. A recording can expose messages, account names and browser tabs even when its intended subject is harmless. Use sample material and tell other people when recording will begin if their voices might be captured. Do not rely on a later crop to remove a secret that should never have been recorded.
Open the application menu and choose Preferences. The reviewed interface includes Recordings Folder, Format, Frame Rate and Delay (Seconds). Select a destination you can identify and write to. A dedicated practice folder keeps test outputs separate from important originals. Check available disk space before a long session. If another application synchronizes that folder, it may upload the recording independently of Kooha. Note the destination now, and keep a removable destination drive connected until saving finishes.
4. Review format, frame rate and delay
Choose an available format in Preferences that the intended player or sharing service accepts. Upstream lists WebM, MP4, GIF and Matroska support; actual available choices and codecs depend on the installed environment. Keep an ordinary default for the first trial. A short file that plays correctly is a better baseline than a recording made with several untested experimental settings.
Review Frame Rate for the material you will show. Mostly static text and rapid movement have different needs, and a higher setting does not guarantee better capture on limited hardware. Delay (Seconds) gives you time to switch to the sample application before recording begins. Choose a brief delay you can follow comfortably. Change one setting between trials and record what changed so an unreadable or silent result can be traced to a specific choice.
5. Select a monitor or capture area
Use the main interface’s selection controls to choose a monitor or an area of the screen. When the desktop shows its sharing chooser, review the selected source before approving it. This dialog belongs to the desktop portal, so its labels and appearance can vary between environments. Follow the prompt on your own system rather than expecting one screenshot to match every Linux distribution.
Move the sample application fully inside the area and check that its text will remain readable at the viewing size you need. Review a remembered selection on each new session. The current interface includes a control to forget previously selected video sources. Selecting a smaller area does not resolve an unsupported desktop backend or grant access to an application the system cannot capture. Diagnose permission and compatibility problems separately before starting an important session.
6. Test sound and pointer visibility
Set the desktop-audio and microphone toggles according to what you want to record. Kooha supports either source or both. The pointer toggle controls whether the mouse pointer is visible, which can help explain clicks. Check each control’s state rather than assuming it matches the previous session. Begin with a microphone-only spoken test or a desktop-sound-only test before combining them.
Speak a short sentence and play a harmless sound, then listen to the saved file. This checks the result viewers receive rather than just whether an icon was enabled. Headphones can reduce speaker sound being captured again by the microphone. Device selection and volume also depend on the desktop sound settings. Recording other people or copyrighted material may need permission; a free recorder does not supply those rights. Start with material you created or are allowed to record.
7. Record, stop and let saving finish
Select Record, complete any source prompt and wait for the configured countdown. State what you will demonstrate, perform the short action and pause briefly at the end. Select Stop to finish. The current interface also has a pause control, but the first exercise only needs one short continuous recording. Avoid terminating the process or unplugging its destination drive to stop capture.
Wait for the application to finish writing the output. The interface can show a flushing state during that final stage; stopping capture does not mean the file is ready immediately. Find the new file in the Recordings Folder selected earlier. If it is empty or an error appears, retain the error message and check destination access and disk space before another small trial. A completed short output is the prerequisite for trusting a long lesson or meeting recording.
8. Check playback before sharing
Open the output in the player your audience will use. Check the beginning, demonstrated action and ending. Confirm that small text is readable, the correct area was captured and the expected sound is present. Look for unexpected notifications or private information. Organize the accepted file only after saving completes and keep its name distinct from later trial versions.
Kooha does not include a complete editing timeline or hosted link library. Use an appropriate separate editor for cuts, titles or redaction. Uploading introduces another service’s privacy settings, limits and possible fees, so inspect those before publication. If you convert a recording, keep the original until the converted output has been checked. Another person should be able to open the result and understand the action without needing access to your computer or your personal accounts.
9. Diagnose capture, audio and performance separately
The project lists PipeWire, its GStreamer plugin, xdg-desktop-portal and a suitable desktop backend among its runtime requirements. A successful app installation does not establish that screen capture works in every desktop session. If recording cannot start or no chooser appears, consult the compatibility and troubleshooting links in the official README. Note your distribution, desktop session and application version so a support report describes the actual environment.
For missing sound, test the two audio sources independently and review operating-system devices and permissions. For poor performance, try a smaller area or less demanding frame rate using the same sample content. Upstream marks hardware encoding, multiple sources and window recording as experimental, with stability or performance concerns; window recording has a documented flickering issue. Keep those features disabled during basic diagnosis. Do not grant unrelated access or remove security controls merely to dismiss an unexplained error.
10. Keep a repeatable recording checklist
After changing a microphone, display, destination drive or desktop session, make another short test. Last month’s successful recording does not verify today’s newly connected device. Keep a small checklist: sample content ready, notifications hidden, capture source reviewed, audio tested, destination checked and output playback confirmed. Review release notes when updates change controls or platform requirements.
Store and back up recordings according to their sensitivity. Local capture avoids a mandatory upload to a recorder service, but it does not encrypt every copy or stop other applications from synchronizing the destination. Read logs before posting them publicly and remove private paths and identifying content while retaining useful error information. Save the version and settings that produced an acceptable result. A dependable workflow has clear, separately reviewed stages for recording, editing, storage and publication.
Official instructions and sources
Official project, features, requirements and troubleshootingProvider-linked Flathub packageFlatpak setup by distributionGPL-3.0 software licenseReviewed main interface and capture controlsReviewed folder, format, frame-rate and timing settingsRelease and platform metadataOriginal AltStack guide by Sushil Kumar Sah. Installation steps follow provider documentation; they do not imply testing on every supported device.